Battery switch on travel trailer function is crucial for managing power from various sources like shore power, your generator, and your house batteries. Understanding how to use your battery switch correctly is key to enjoying comfortable and safe travels. This guide will walk you through the different types of switches, troubleshooting common problems, and best practices for power management to keep your RV running smoothly.
We’ll cover everything from basic operation to advanced techniques for extending battery life and preventing power drain.
Whether you’re a seasoned RVer or a newbie, mastering your travel trailer’s battery switch is essential for a successful trip. This guide will break down the complexities into easy-to-understand steps and provide practical advice to help you confidently manage your power systems. We’ll also delve into safety precautions and wiring diagrams to ensure you handle the electrical system safely and effectively.
Understanding Battery Switch Functionality in Travel Trailers
Your travel trailer’s battery switch is a crucial component for managing power, allowing you to seamlessly switch between different power sources and protect your batteries. Understanding its function is key to enjoying reliable power on the road. This section will explain the different types of switches, their operation, and the advantages and disadvantages of each.
Types of Battery Switches
Travel trailers utilize various battery switch types to control power flow. Common types include single switches, dual switches, and three-way switches. A single switch simply connects or disconnects your house batteries from the trailer’s electrical system. Dual switches allow independent control of two battery banks (often a starting battery and a house battery bank), while a three-way switch adds a third position, usually to connect both banks to the system simultaneously.
The specific switch type in your trailer will depend on its wiring and power needs.
Purpose of a Battery Switch in Power Management
The primary purpose of a battery switch is to manage power from your different sources: shore power (hookups at campsites), a generator, and your house batteries. When connected to shore power or a generator, the battery switch typically isolates your house batteries, preventing them from discharging and potentially damaging sensitive electronics. When off-grid, the switch allows you to power your trailer’s appliances and lights using your house batteries.
This prevents accidental draining of your batteries when connected to external power sources.
Operating a Battery Switch: A Step-by-Step Guide
Proper operation of your battery switch is essential. Before attempting any operation, always ensure that your trailer’s main breaker is switched OFF. First, locate your battery switch; it’s usually found near your battery compartment or inside a control panel. The switch will have clearly marked positions, often including “Off,” “Battery,” “Shore/Gen,” and potentially a combined “Both” position depending on your switch type.
To use the batteries to power your trailer, select the “Battery” position. To use shore power or a generator, select the “Shore/Gen” position. If you have a three-way switch, the “Both” position connects both batteries and external power, usually for charging the batteries while simultaneously using power from the external source. Remember to return the switch to the “Off” position when storing your trailer for extended periods.
Advantages and Disadvantages of Different Battery Switch Configurations
| Battery Switch Type | Advantages | Disadvantages |
|---|---|---|
| Single | Simple, inexpensive, easy to operate. | Limited control; can’t isolate batteries from the system completely when on shore power or generator power. |
| Dual | Allows independent control of two battery banks, enabling prioritized use of one bank (e.g., starting battery) while preserving the other (e.g., house battery). | Slightly more complex than a single switch. |
| Three-Way | Offers the most control, allowing combined use of batteries and external power sources for charging and simultaneous power use. | Most complex and expensive option. |
Troubleshooting Common Battery Switch Issues

Dealing with a malfunctioning battery switch in your travel trailer can be frustrating, but with a systematic approach, you can usually pinpoint the problem and get back on the road. Common issues stem from simple problems that are easily resolved, saving you potential repair costs. Let’s look at how to diagnose and fix some of the most frequent problems.
Battery switch problems usually manifest as a complete lack of power to the trailer’s systems, or inconsistent power depending on the switch position. This could be due to a faulty switch itself, corroded connections, or problems with the wiring. Before diving into troubleshooting, remember to always disconnect the negative battery cable before working on any electrical components for safety.
So, you’re planning a trip? Awesome! First things first: get yourself sorted with travel insurance. Check out Aon travel insurance for some solid options; you’ll want peace of mind knowing you’re covered. Then, if you’re an audiophile like me, don’t forget your tunes! Planning your audiophile travel setup beforehand is key for enjoying those epic playlists on the go.
Make sure to pack accordingly!
Diagnosing a Non-Functional Battery Switch
A methodical approach is key to troubleshooting a non-functional battery switch. Start by visually inspecting the switch and its connections. Look for any obvious signs of damage, corrosion, or loose wiring. Pay close attention to the terminals and the wiring leading to and from the switch. Corrosion is a common culprit, often appearing as a green or white powdery substance.
Loose connections can also interrupt the electrical flow.
If a visual inspection doesn’t reveal the problem, you’ll need to use a multimeter to test the continuity of the circuit. Begin by checking the voltage at the battery terminals. If the battery isn’t providing power, that needs to be addressed first. Assuming the battery is good, then test the voltage at the input and output terminals of the switch in each position.
A significant voltage drop across the switch indicates a problem with the switch itself or a bad connection within the switch. If voltage is present at the input but absent at the output in the appropriate position, this points to a problem within the switch’s internal mechanism or its connections.
Troubleshooting Flowchart
Imagine a flowchart with three main branches.
The first step is a visual inspection. If the inspection reveals a problem (loose wires, corrosion), the solution is to tighten connections and clean corrosion. If the inspection doesn’t reveal a problem, the next step is to test the voltage at the battery and the switch terminals with a multimeter. If the battery voltage is low or absent, then charge or replace the battery.
If the battery voltage is good but there’s no voltage at the switch terminals, then the problem lies with the wiring between the battery and the switch. This would require tracing the wiring and repairing any breaks or faulty connections. Finally, if the battery voltage is good and voltage is present at the switch terminals, but not at the output, the switch itself is likely faulty and needs to be replaced.
Preventative Maintenance for Extended Lifespan
Regular maintenance can significantly extend the life of your battery switch. A simple annual inspection, including a visual check for corrosion and loose connections, is highly recommended. Cleaning the terminals with a wire brush and applying a corrosion inhibitor can prevent future problems. Additionally, periodically checking the tightness of all connections ensures reliable operation. By taking these preventative steps, you can avoid unexpected breakdowns and enjoy years of reliable service from your battery switch.
So, you’re planning a trip? Awesome! First things first: get yourself sorted with travel insurance. Check out Aon travel insurance for some solid options; they’ve got you covered for most eventualities. Then, if you’re an audiophile like me, don’t forget your tunes! Planning your audiophile travel setup in advance is key to enjoying those amazing soundscapes on the go.
Make sure you pack your favorite headphones and a portable DAC for the best experience.
Battery Switch and Power Management in Travel Trailers
Your travel trailer’s battery switch is the central nervous system of your power system, controlling the flow of electricity between your batteries, shore power, and generator. Understanding how it works is crucial for preventing costly battery drain and ensuring a smooth camping experience. Proper management extends the life of your batteries and avoids frustrating power outages.
The battery switch acts as a gatekeeper, directing power from various sources to your trailer’s systems. It prevents accidental drain from your house batteries when not in use, and allows you to charge them efficiently from shore power or a generator. This control is especially important when you’re not actively using the trailer, as even small parasitic draws can deplete your batteries over time.
Battery Switch Operational Modes
The following table illustrates how power flows through a typical battery switch in different scenarios. Note that specific switch configurations may vary slightly depending on your model and setup. Always consult your owner’s manual for detailed instructions specific to your trailer.
| Mode | Shore Power Status | Generator Status | Battery Status | Power Flow |
|---|---|---|---|---|
| Off | Connected or Disconnected | Running or Off | Disconnected | No power to trailer systems from batteries. Shore power and generator power may still be available to some circuits (depending on wiring). |
| Batteries Only | Disconnected | Off | Connected | Power to trailer systems comes solely from the house batteries. |
| Batteries & Shore Power | Connected | Off | Connected | Power to trailer systems comes from shore power, with batteries charging. |
| Batteries & Generator | Disconnected | Running | Connected | Power to trailer systems comes from the generator, with batteries charging. |
Battery Power Conservation Best Practices
Conserving battery power is essential for extending their lifespan and ensuring you have power when you need it. These best practices will help you maximize your battery life and avoid unexpected power failures.
- Minimize the use of high-power appliances like air conditioners and microwaves when not connected to shore power or a generator.
- Turn off lights and appliances when not in use. Consider using LED lighting, which consumes significantly less power than incandescent bulbs.
- Unplug chargers and other devices when not actively charging. Even small devices draw power when plugged in.
- Use a battery monitor to track your battery’s state of charge and anticipate when you need to recharge.
- Consider adding solar panels to supplement your battery charging capabilities.
Adding Additional Battery Banks
Adding extra battery banks to your travel trailer increases your power capacity, allowing you to run more appliances for longer periods without needing to connect to shore power. However, connecting additional batteries requires careful planning and potentially modifications to your existing system. It’s crucial to ensure the added batteries are compatible with your current system (voltage, amperage) and to install them correctly to avoid damage or safety hazards.
This often involves adding additional wiring and potentially a larger battery switch capable of handling the increased load.
For example, adding a second 12-volt battery bank might require a larger battery switch with more positions, additional wiring to connect the new bank, and possibly a more robust charging system. It is highly recommended to consult with a qualified RV technician to ensure proper installation and avoid potentially dangerous situations. Improper installation could lead to overcharging, overheating, and fire hazards.
Safety Precautions and Wiring Diagrams
Working with your travel trailer’s electrical system, especially the battery switch, requires caution. Improper handling can lead to serious injury or damage to your equipment. Always prioritize safety when performing any electrical work.Before you begin any work on your travel trailer’s electrical system, disconnect the negative (-) battery cable from the battery. This single action is the most crucial safety step to prevent accidental shocks or short circuits.
Remember, even seemingly inert components can retain a charge.
Safety Precautions When Working with the Battery Switch, Battery switch on travel trailer function
Working with batteries and electrical systems involves inherent risks. Always wear appropriate safety gear, including safety glasses to protect your eyes from sparks or acid splashes, and insulated gloves to protect your hands from electrical shocks. Ensure the area is well-ventilated to avoid inhaling potentially harmful battery fumes. Never work alone; have someone nearby who can assist in case of an emergency.
If you’re unsure about any aspect of the process, consult a qualified electrician.
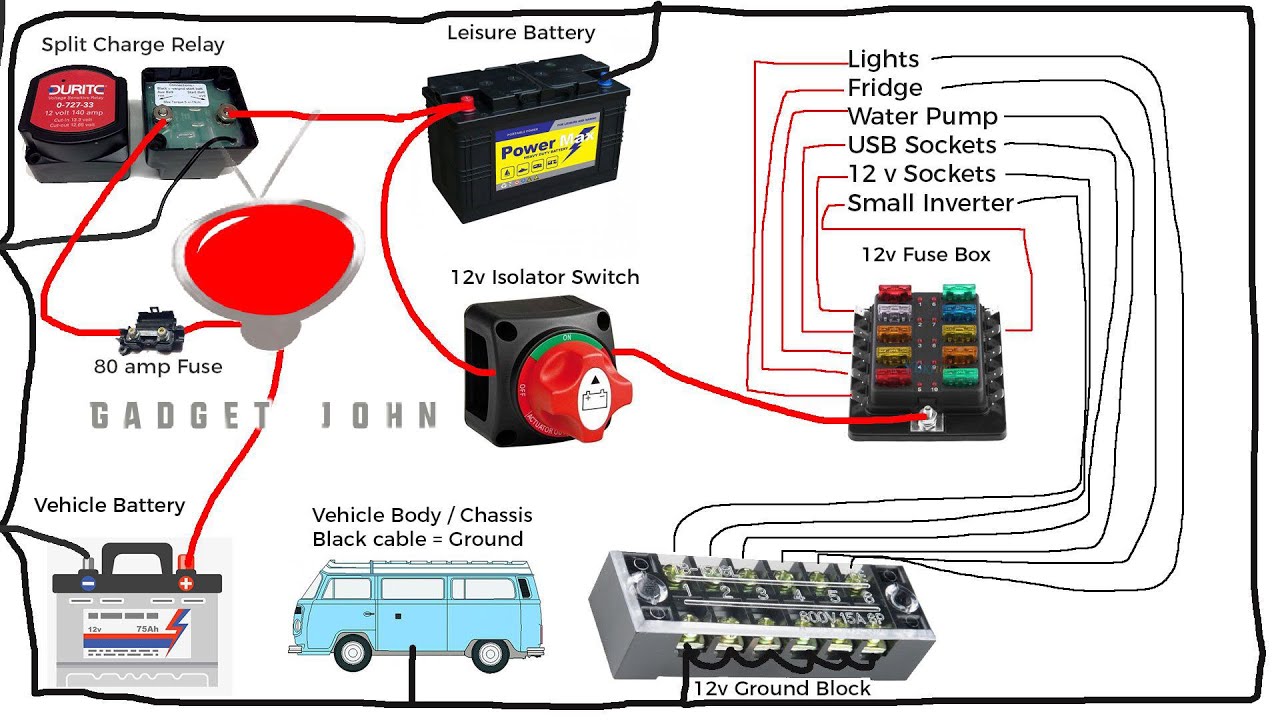
Typical Travel Trailer Battery Switch Wiring Diagram
A typical setup involves a battery switch connecting the trailer’s battery to the main power distribution panel. The switch itself acts as a disconnect, allowing you to isolate the battery from the rest of the system. Imagine a simple diagram: The battery’s positive (+) terminal connects to one side of the switch. The other side of the switch connects to a fuse, providing overcurrent protection.
From the fuse, a heavy-gauge wire runs to the positive bus bar of the distribution panel. The negative (-) terminal of the battery is typically directly connected to the trailer’s chassis (ground), completing the circuit. This ground connection is vital for proper operation and safety. Additional circuits branch off from the distribution panel to power various appliances and systems within the trailer.
Importance of Proper Grounding and Fusing
Proper grounding is essential for safety and proper electrical function. The negative (-) battery terminal should be connected directly to the trailer’s chassis, which acts as a ground plane. This ensures that any stray current flows safely to the ground, preventing dangerous voltage buildup. The fuse protects the wiring and components from overcurrent situations, such as short circuits.
A properly sized fuse will blow before the wiring overheats and potentially causes a fire. Selecting an undersized fuse is a serious safety hazard.
Potential Hazards of Incorrect Battery Switch Usage and Wiring
Incorrect wiring can lead to several hazards. A poorly connected or improperly fused circuit might overheat and cause a fire. A faulty ground connection could result in dangerous voltage buildup on the chassis, potentially causing a shock hazard. Using the wrong size fuse can lead to either circuit damage from an undersized fuse failing to protect or a fire from an oversized fuse not blowing during a short circuit.
For example, incorrectly connecting the positive (+) and negative (-) terminals of the battery to the switch could result in an immediate short circuit, potentially causing sparks, fire, or damage to the battery and surrounding components. Failing to disconnect the negative terminal before working on the system increases the risk of electric shock.
Mastering your travel trailer’s battery switch isn’t just about flipping a switch; it’s about understanding the intricate dance of power management. By understanding the different types of switches, troubleshooting techniques, and safety procedures, you’ll ensure a smooth and enjoyable RV experience. Remember, proper maintenance and preventative measures will extend the life of your system and prevent costly repairs down the road.
So, get familiar with your battery switch, and happy travels!
FAQ Explained: Battery Switch On Travel Trailer Function
What happens if I accidentally leave my battery switch in the wrong position?
Depending on the position, you could experience a dead battery, blown fuses, or even damage to your electrical components. Always double-check the switch position before leaving your trailer.
How often should I check my battery switch and connections?
Regularly inspect your battery switch and connections for corrosion, loose wires, or any signs of damage. At least once a year, and more frequently if you notice any problems.
Can I use a different type of battery switch than what came with my trailer?
It’s generally possible, but ensure the replacement switch has the correct amperage rating and configuration for your system. Consulting a qualified RV technician is recommended for this modification.
My battery switch is making a clicking sound. What does that mean?
A clicking sound often indicates a problem with the switch itself, or a faulty connection. This usually points to a loose wire, a bad connection, or a problem within the switch mechanism. It requires further investigation.
